How to Change the word press themes the Complete Guide
Themes Changing in WordPress is a relatively straightforward process that can be done through the WordPress dashboard. The changing of the WordPress theme will not delete any of your stored data. All the data which you have stored through your old WordPress will be secured. How you are choosing the WordPress theme for your website will surely have an impact on your website as this will affect the performance of your site’s SEO.
It is quite understandable that people who use free WordPress themes can change their website’s look and enhance its whole structure more frequently as compared to those people who purchase premium WordPress themes for their website.Here’s a step-by-step guide on how to change the WordPress theme:
Table of Contents
Method 1: Using the WordPress Dashboard:
Step 1: Log in to Your WordPress Dashboard:
- Open your web browser and navigate to your WordPress website’s login page (typically located at your domain.com/wp-admin).
- Enter your username and password to log in to the WordPress dashboard.
Step 2: Navigate to the “Themes” Section:
- Once logged in, you’ll be taken to the WordPress dashboard.
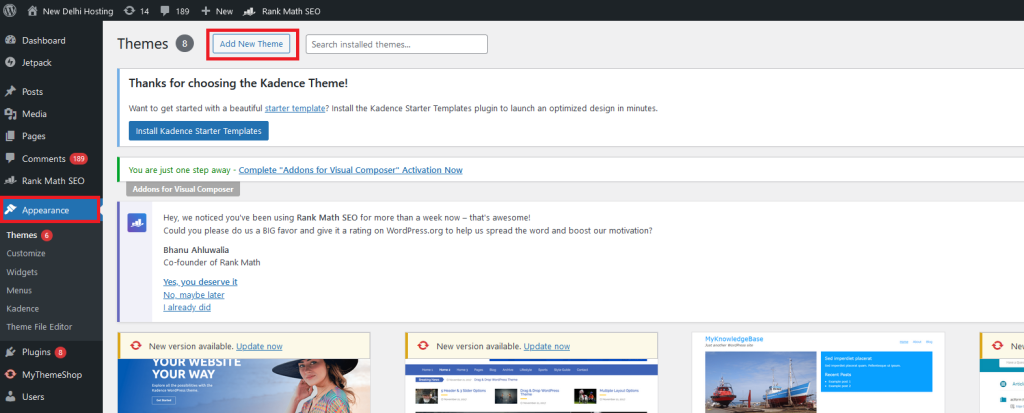
- In the left-hand sidebar, hover over the “Appearance” menu item, and then click on “Themes.”

Step 3: Browse Available Themes:
- You’ll be taken to the “Themes” page, where you can see all the installed themes.
- Click on the “Add New” button at the top of the page to browse and search for new themes from the WordPress theme directory.
Step 4: Choose a New Theme:
- Browse through the available themes or use the search bar to find a specific theme.
- When you find a theme you like, hover over it, and click the “Install” button.
- Wait for WordPress to download and install the theme. Once installed, the “Install” button will change to “Activate.”
Step 5: Activate the New Theme:
- Click on the “Activate” button to make the newly installed theme active on your website.
- Once activated, you’ll see a success message confirming that the theme has been activated.
- Your website will now display using the new theme.
Method 2: Uploading a Theme:
If you have a theme file (in .zip format) that you’ve downloaded from a third-party website, you can upload it directly to WordPress using the following steps:
Step 1: Navigate to the “Themes” Section:
Follow steps 1 and 2 from Method 1 to access the “Themes” page in the WordPress dashboard.
Step 2: Upload the Theme:
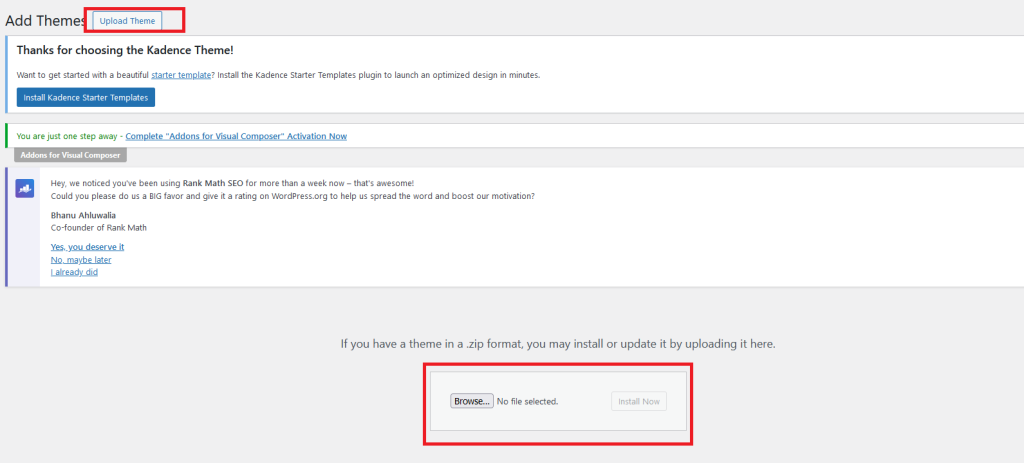
- Click on the “Upload Theme” button at the top of the page.
- Choose the theme file (.zip format) from your computer and click “Install Now.

Step 3: Activate the Theme:
Once the theme has been uploaded and installed, click on the “Activate” button to make it active on your website.
Method 3: Using the Customizer:
Some themes allow you to preview and change settings using the WordPress Customizer. Here’s how to do it:
Step 1: Navigate to the Customizer:
- From the WordPress dashboard, go to “Appearance” > “Customize.”

Step 2: Change Theme Settings:
- In the Customizer, you’ll see various settings and options specific to your theme.
- You can customize colors, fonts, layout options, and more, depending on the capabilities of your theme.
Step 3: Publish Changes:
- Once you’ve made your desired changes, click the “Publish” button to save and apply them to your website.
Conclusion:
Changing a WordPress theme is a simple process that can be done through the WordPress dashboard. Whether you’re browsing and installing themes from the WordPress theme directory or uploading a theme file from a third-party source, WordPress makes it easy to switch themes and customize your website’s appearance to suit your needs. Just remember to preview your website after changing the theme to ensure everything looks as expected.


