Effortless WordPress Installation with the Help of Softaculous
Installing WordPress using Softaculous is a user-friendly and efficient way to set up a WordPress website on your hosting server. Softaculous is an auto-installer script library that simplifies the process of installing various web applications, including WordPress. Here’s a step-by-step guide on how to install WordPress using Softaculous:
1. Access Your Hosting Control Panel:
Log in to your hosting control panel. This could be cPanel, Plesk, or another control panel provided by your hosting provider.

2. Locate and Open Softaculous:
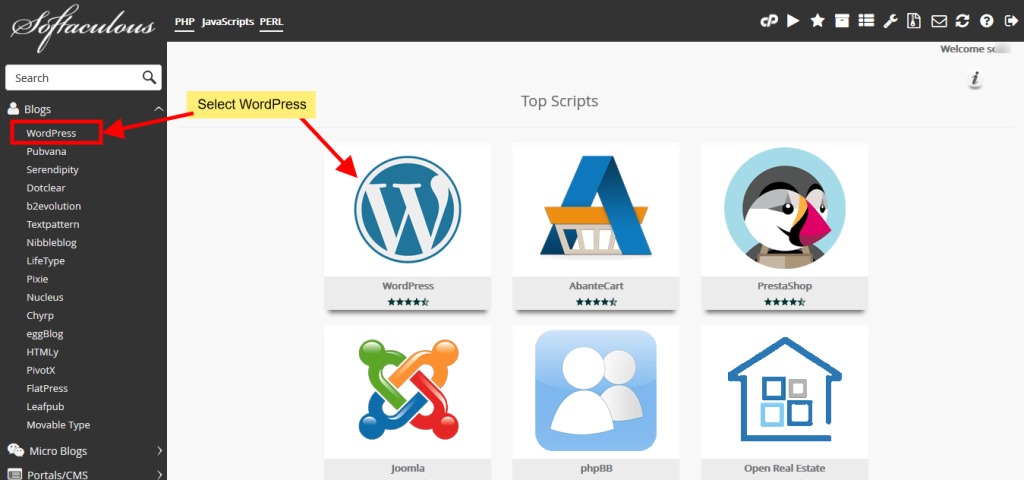
In the control panel, find the Softaculous icon or look for the “Softaculous Apps Installer” section. Click on it to open Softaculous.
3. Search for WordPress:
Once inside Softaculous, you’ll see a list of available applications. Use the search bar or navigate to the “Blogs” category to find WordPress. Click on the WordPress icon to proceed.
4. Choose WordPress Version:
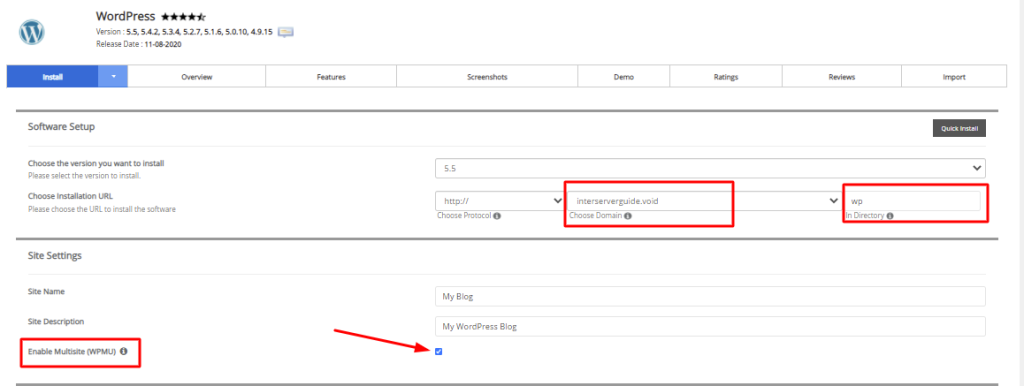
Softaculous usually provides the option to install different versions of WordPress. Select the version you want to install. It’s recommended to choose the latest stable release for security and feature updates.
5. Configure Installation Settings:
Fill in the required details for your WordPress installation:
- Choose Protocol: Select whether your site will use HTTP or HTTPS.
- Choose Domain: Pick the domain where you want to install WordPress if you have multiple domains.
- In Directory: Leave this field empty if you want WordPress to be installed on the main domain. If you want it in a subdirectory (e.g., example.com/blog), enter the subdirectory name.
6. Site Settings:
Set the site name and description for your WordPress website. You can change these later from the WordPress admin dashboard.
7. Create an Admin Account:
Set up the administrator username, password, and email. Ensure that you use a strong password and provide a valid email address for admin notifications.
8. Choose Language and Plugins:
Select your preferred language for the WordPress installation. You can also choose to install additional plugins (e.g., Limit Login Attempts, Classic Editor) during the installation process.
9. Select Theme (Optional):
Softaculous may provide an option to choose a theme during the installation. You can either pick a theme now or do it later within the WordPress admin dashboard.
10. Advanced Options (Optional):
Expand the “Advanced Options” section if you need to configure advanced settings, such as database name, table prefix, and backup options. In most cases, the default settings work fine.
11. Install WordPress:
Review the settings you’ve configured and click the “Install” button to initiate the WordPress installation process. Softaculous will display a progress bar, and the process usually takes just a few moments.
12. Completion and Access:
Once the installation is complete, Softaculous will provide a link to your newly installed WordPress site and the admin dashboard. You can access your site using this link and log in to the admin dashboard using the credentials you set up earlier.

13. Post-Installation Steps:
After installation, it’s recommended to perform the following steps:
- Log in to the WordPress admin dashboard.
- Change the default admin password.
- Configure site settings, including permalinks and general settings.
- Install a theme and necessary plugins based on your website requirements.
14. Secure Your WordPress Site:
Strengthen the security of your WordPress site by:
- Installing a security plugin (e.g., Wordfence or Sucuri).
- Regularly updating WordPress, themes, and plugins.
- Enabling two-factor authentication for admin accounts.
Conclusion:
Installing WordPress using Softaculous is a straightforward process that eliminates much of the manual configuration. Softaculous streamlines the setup, allowing you to focus on building and customizing your WordPress website. By following these steps and performing post-installation optimizations, you’ll have a secure and functional WordPress site ready for content creation and online presence.


